I got the back motor mount bolts out! All it took was admitting to myself that they weren't coming out whole.
I had spent the last several days repeatedly soaking the bolts in PB. I also tried application of heat, with no luck (though it did a fine job of burning off the oil). I considered all sorts of unlikely clamp arrangements to force the bolts out backward, but to no avail.
Then it occurred to me... remove the heads from the bolts, then use the nuts on the other ends to pull the bolt through the case holes. I used a stack of washers, to which I added as needed, to ensure that the nut never quite made it down to the point where the threads ran out. In short, it worked.
I slipped a spare junk bolt into the left-side hole before removing the right-side bolt, to support the engine until I'm actually ready to remove it. I'm not sure my provisions for removing the engine are adequate, so I'm going to rethink them for a few days before proceeding.
Still have a broken bolt in a case hole to remove. It's a small one; I may give in and just cut the permanent nut off of the frame and substitute a normal tap.


honda305.com Forum
Vintage Honda Owners, Restorers, Riders and Admirers
1966 Honda Dream Barn Find, or, I Must Be Crazy
-
Solomoriah

- honda305.com Member
- Posts: 55
- Joined: Sun Jun 24, 2012 8:50 pm
- Location: La Belle, MO
-
Solomoriah
- honda305.com Member
- Posts: 55
- Joined: Sun Jun 24, 2012 8:50 pm
- Location: La Belle, MO
I got the oil filler plug/dipstick out tonight. Recall that I said I broke the handle part; as I noted elsewhere, my plan to remove it was to Dremel a slot in the top, then use a large screwdriver (one of those that you can apply a half-inch wrench to for leverage) to remove it.
Short version: Slot yes, remove with screwdriver no. I still couldn't budge it.
So I decided to use the Dremel to cut a notch out of one side, then used a cold chisel and hammer rather gingerly to loosen it. Somewhere along there I applied heat, and I used a bunch of PB besides. Finally, it broke loose and came out.
Amazingly, I'm pretty sure I didn't get any shavings into the crankcase. I threaded the plug back in a couple of turns to keep crud out of the engine, and moved on to that troublesome frame hole with the broken screw in it.
I had a brand-new "easy out" of the sort that can be turned in either direction; it was my hope to turn the stub of the bolt in rather than out, as I am pretty sure that rust on the end of the bolt is what caused it to jam up and break in the first place. But no luck... it won't move, and I'm pretty sure now that I've screwed up about half the female thread to boot... the easy-out just kept taking shavings out of the bolt rather than moving it.
The hole that is troubling me is the left-hand (i.e. front) tool tray bolt. Since the tool tray seems to also be the retainer for the battery, I'll have to do something about it. I think I can just cut that threaded bit off the back, then use an ordinary nut in place of it; it's not hard to get a hand on it from the front with the carburetor housing off.
I pulled the horn and opened it up, and it looks pretty clean inside; there were some cobwebs in the horn opening, which I fished out with a piece of wire. But it still sounds like a sick cow when I honk it with a fresh battery. Not sure if it's supposed to sound like that or not.
Anyway, I made some progress. But the pistons are still stuck. I'm going to try the acetone-and-ATF cocktail just as soon as I can get some acetone.

-
Solomoriah
- honda305.com Member
- Posts: 55
- Joined: Sun Jun 24, 2012 8:50 pm
- Location: La Belle, MO
Hey, thanks. I've been following your restoration thread also. A Superhawk would have been my first choice... but you can't complain when you get one given to you.
Really, bad as it looks on the surface, it's got good "bones." The frame looks good, and the engine appears complete; once I get the pistons free, it's just a very long series of small steps with a few big ones scattered around.
I'm going to have to learn a LOT to get this done. Good thing I like learning.
As to the picture issue: I have a bunch of pictures I've taken, or had Tracy (my wife) take, since I got started, but they are almost entirely documentation. You know, what parts go where, etc. But here's one Tracy shot of me in the garage the first evening:
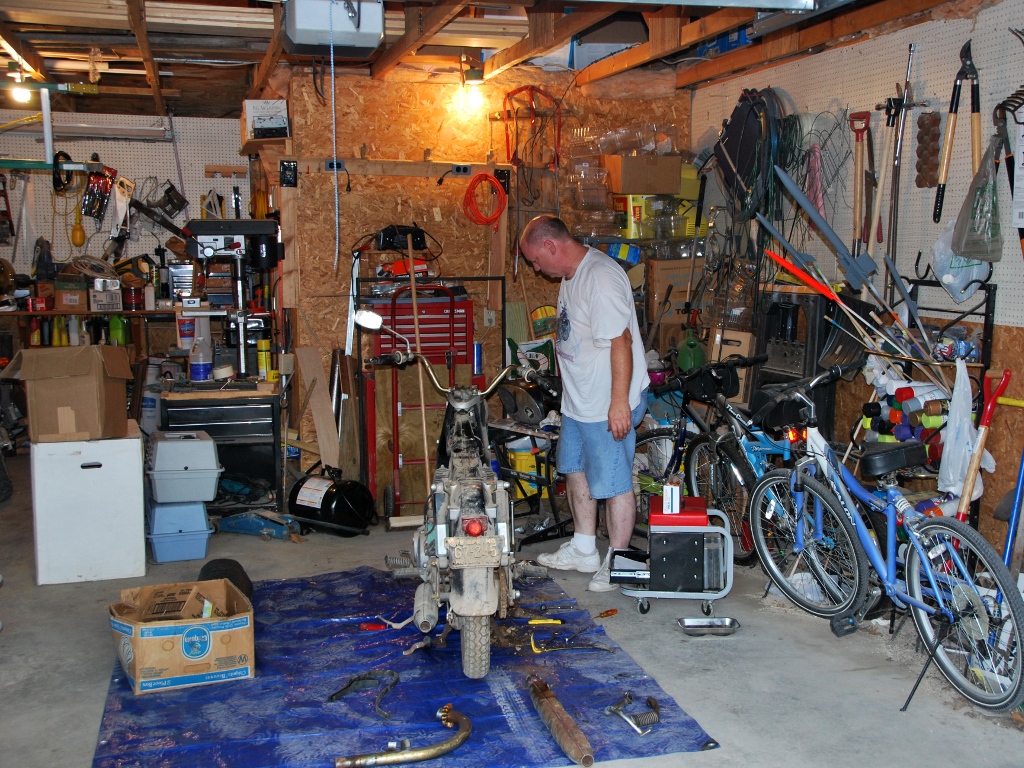
It's hardly the well-equipped and tidy sort of garage I have seen on this very site repeatedly... but it's what I've got, and I'm making it work.
Really, bad as it looks on the surface, it's got good "bones." The frame looks good, and the engine appears complete; once I get the pistons free, it's just a very long series of small steps with a few big ones scattered around.
I'm going to have to learn a LOT to get this done. Good thing I like learning.
As to the picture issue: I have a bunch of pictures I've taken, or had Tracy (my wife) take, since I got started, but they are almost entirely documentation. You know, what parts go where, etc. But here's one Tracy shot of me in the garage the first evening:
It's hardly the well-equipped and tidy sort of garage I have seen on this very site repeatedly... but it's what I've got, and I'm making it work.
-
Solomoriah
- honda305.com Member
- Posts: 55
- Joined: Sun Jun 24, 2012 8:50 pm
- Location: La Belle, MO
I got some acetone yesterday, and I thought I had ATF in the garage, so tonight I planned to mix it up and put it in. I propped up the front wheel to make the cylinders more level, and then I grabbed the air hose to blow the diesel out of the engine. It was my intention to catch the majority of the diesel thus removed with paper towels; that didn’t work out quite like I planned, and I got pretty well hosed down with it instead.
Gah. Nasty.
One shower later, I went looking and discovered that no, I don’t have any ATF left. Crap. Guess I’ll get it tomorrow.
Oh, and of course, the engine is still frozen up.
Still, in an optimistic mood, I began to consider what I’ll need to do to start it once things are moving. I’ll check the valves to ensure that they are all free, of course, and the carburetor will get a good cleaning. With that done, I’ll need the usual things: fuel, air, and spark. It’s the latter that I’m concerned about right now.
The spark plugs are, as mentioned before, out of the engine; one is broken, the other missing outright. So I need plugs. I’m not sure if the engine will run without the battery, which I’d naturally like to avoid purchasing until the bike is closer to rolling condition, but if I have to buy one, I will. Much of the wiring harness looks good, except, unfortunately, for the wire connected to the points, so I’ll have to work that out.
My real problem at present is the coil and plug wires, which are apparently a single unit, despite what Bill Silvers has to say here:
http://en.allexperts.com/q/Motorcycle-R ... am-305.htm
He is talking about a ’62 model in that post, whereas mine is a ’66 model, so that might make a difference; however, on the CMS website here:
http://www.cmsnl.com/honda-c77-dream_mo ... t/F29.html
the parts listing indicates that all CA77 models used the same coil and plug wires arrangement.
The coil tests out to 3.8 Ohms across the small wires, which I’m going to call close enough to the 4.5 Ohms Bill prescribes to make me willing to try it. I just have to do something about the plug wires, or at least the caps, which are pretty busted up.
Anyone have any suggestions?
- Attachments
-
-

Cap thread here:
http://www.honda305.com/forums/which-sp ... light=caps
http://www.honda305.com/forums/which-sp ... light=caps
66 dream, 78 cb750k, 02fz1, 09 wing
-
Solomoriah
- honda305.com Member
- Posts: 55
- Joined: Sun Jun 24, 2012 8:50 pm
- Location: La Belle, MO
Thanks, Brewsky!
I had some ups and downs tonight, but overall I'm feeling a bit negative. I started by mixing up some of the pink stuff, acetone plus ATF, in a jar that once held maraschino cherries; it looked more than a little like cherry juice, but it sure didn't smell that way. Poured some in each cylinder until it started running back out.
Next I pulled the valve covers and took a look inside; things look surprisingly good in there, and I was able to verify that all four valves are free.
So I turned my attention to the steering damper knob. I've been spraying it with PB since I got it home, every night, but had not been able to move it. I put a bit more force into it tonight and broke the darn thing off flush with the top of the steering stem.
Crap.
After carefully removing the damper friction discs (and coming up one short, according to the schematic), I carefully drilled a hole straight through the bolt stub, applied some heat, then after it was reasonably cool I poured on some of the pink stuff. I was surprised at how it seemed to clean up the whole area.
I drove in my easy-out, put my crescent wrench on it and promptly broke the easy-out.
Crap, again.
I found a punch and drove the broken-off piece of the easy-out through the bolt stub and into the steering head. So at least I still have my hole in the stub to work with. I poured a bit more pink stuff on it, documented (photographed) and bagged up the damper parts, and called it a night.
I guess I'll have to get another easy-out and have another go at it. I won't have time to work tomorrow, so hopefully the time will be well spent by the pink stuff as it eats its way through the rust.
I suspect I can screw the bolt stub into the steering stem rather than out, letting it fall through the hollow tube. Having never seen one taken apart before, I don't know that for sure. Hopefully someone will chime in and let me know.