davomoto wrote:Remove the top cover, and turn engine over with stator bolt until the master link appears. A pair of pliers will easily remove the clip, try not to drop it in the lower end. There are two bolts by the spark plug holes that must be removed. After that the head and cylinder can be removed. It's all laid out nicely in the Silver book. PM me if you get stuck, and I'll send you my phone number. davomoto
1962 Superhawk Restoration: Here I goDavo, thanks man. That's really nice of you. I have both of Silver's books, of which I've been reading over the past few nights. Just soaking up the info on paper. He could really use an edition with photos. I took everything apart when I pulled it off, but got stuck when I realized the cam chain was holding everything down, which the book confirmed. Good to know pliers can pull that link off. Can't wait to get at it!
Current restoration: 1962 CB77
http://www.flickr.com/photos/1962_cb77_restore/ I was able to pull the cylinder head off to get a look at the valves and pistons. The valves (sorry, didn't get a photo) are just as dirty as the pistons. The gaskets were in surprisingly good shape though. Looks like someone replaced those semi-recently. Thoughts?
 Here's a close-up of the right piston.  Close-up of the left piston head. There's some interesting debris, which looks foreign. Possibly came in through the carb intakes? Those were quite dirty inside.  Current restoration: 1962 CB77
http://www.flickr.com/photos/1962_cb77_restore/
Here's the pistons right after I pulled the cylinder head.
 Close up of the left piston and piston rings. How do the rings look to you? Its hard for me to tell what's good or not.   Right cylinder valves and spark plug. As you can see the bike was running very rich, or possibly burning oil. Hard for me to tell at this point.   Apparent scratches in the cylinder sleeve. Are these deep enough to warrant honing?  Cylinder wall discoloration. Does this look like "blow-by" to you?   Current restoration: 1962 CB77
http://www.flickr.com/photos/1962_cb77_restore/ The center stand was painted with an black epoxy appliance paint, per recommendation. Its a tough paint that's resistant to wear and chemicals. Perfect temporary solution for powder coating.
There was quite a bit of rust and chipping before hand. Lots of little nooks (where brackets connect to the "U" shaped legs) that were just filling up with rust. Took quite a while to get this thing stripped and cleaned up. The paint has since dried and retained a more even smoother finish. Though there is still a very, very slight grain to it. The metal and welds are pretty gnarly. I kinda wish I would have sanded down some of the little misc. imperfections throughout the metal work. But oh well, that's how it was originally. I'm curious to see how this paint holds up. I'm eager to get the rest of my painting finished, but the weather has been absolutely terrible. Endless cold rain (humidity).  Current restoration: 1962 CB77
http://www.flickr.com/photos/1962_cb77_restore/
EngineMine had at least that much carbon buildup and the cylinders look alittle bit better than mine. I had 125 PSI compression on both cylinders before I dissassembled. My pistons cleaned up well and are within specs. I'm planning on hone job and rering. That was after getting the motor unstuck. Your coming along quite well. Really enjoying your pictures.
64' CB77
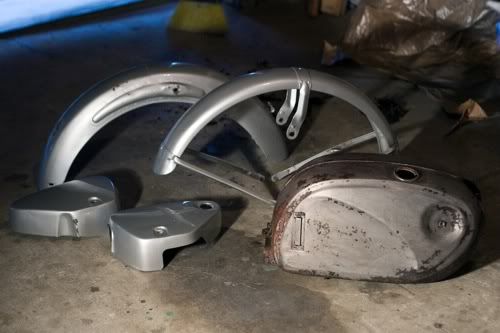
65' CB160 So I took both fenders and air covers down to a recommended auto body and fender shop called Bertoluccis.
I was quoted between $1,100 - $1,500 to strip and paint the pieces. At which point I took my parts and left. I was told there's a "motorcycle guy" that paints parts, but he'd charge around twice as much. Am I crazy here? What's a ballpark reasonable price I can expect to pay based on your experience? I'd love to have some of the main pieces professionally painted, but if prices are anywhere near this high, I might just look into getting a paint gun.  Current restoration: 1962 CB77
http://www.flickr.com/photos/1962_cb77_restore/
| |||||||||||||||||||||||||||||||||||||||||||||||||||||||||||||||||||||


