honda305 Home honda305 Auctions honda305 Gallery honda305 Forum


honda305.com Forum

Login
□ Search
□ FAQ 
□ 
Vintage Honda Owners,
Restorers, Riders and
Admirers

Honda C200

Who said it was only about Motorcycles? What else do you collect, restore, enjoy... ?
Spargett
honda305.com Member
Posts: 592
Joined: Wed Jun 18, 2008 10:19 pm
Location: Los Angeles, CA

Post by Spargett » Sun Mar 22, 2009 7:43 am

So I've been having some problems getting the finish I'd like from polishing with a bench grinder. Here's the steps, along with the supplies I used. I feel like I spent no shortage of time on these and, I'm lacking the quality results I'm looking for.

How long (ballpark) should I spend polishing? I prob spend about 20-25 mins polishing with each compound on each wheel. For a total of 1.5 hours. Not too pushing too hard, or too light. Not applying too much polish. Just a touch every 0.5-1 minute or so.

Is is the quality of polish? I picked this stuff up at Harbor Freight (pure quality). Is it the fact that I'm not sanding enough? Do I need to keep it on the wheel for longer? etc. etc. Any tips are greatly appreciated. I had/have really high hopes for this, especially after seeing how easy you make it look, I'm left feeling particularly dumb, like I'm doing something completely wrong here. It's certainly an improvement, but I could have easily gotten these results by hand.

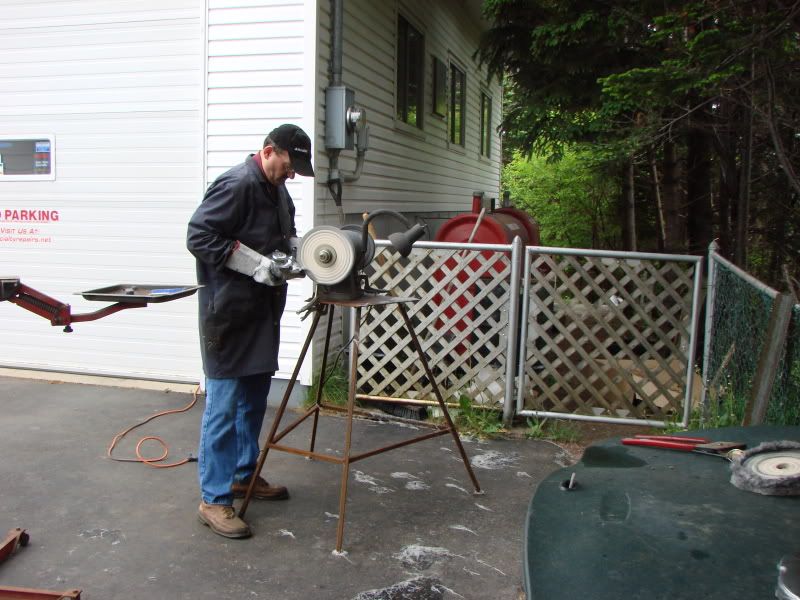
Here I am wet sanding out some of the corrosion on the rear wheel's brake hub. I sprayed the top with paint stripper to remove any possible lacquer that could on the metal. I then sanded with 600 - 1000 grit paper.

Image

[url=Here's a shot of the rear hub after polishing. After wet sanding for about 15-20 minutes, I used the black emery on the spiral sewn wheel to cut. Then polished with the white rouge bar on a loose spun cotton wheel, then finally buffed out on a clean, very soft buffing wheel.

I'm not getting the results I want right now. I feel like I'm halfway to the mirror finish. There's still alot of imperfections in the metal. I'm wonder if that's because of a lack of sanding before hand, or improper use of polishing.

Image

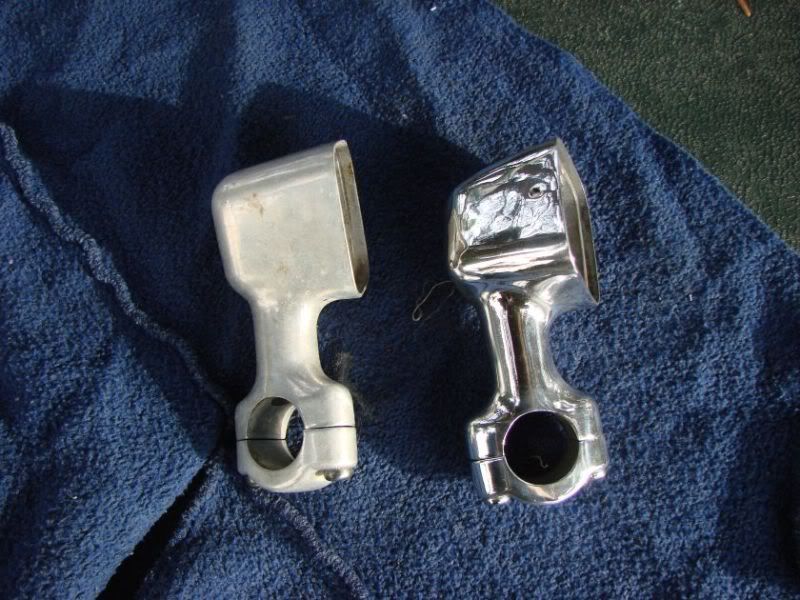
Here's a close-up of the rear hub after polishing. After wet sanding for about 15-20 minutes, I used the black emery on the spiral sewn wheel to cut. Then polished with the white rouge bar on a loose spun cotton wheel, then finally buffed out on a clean, very soft buffing wheel.

I feel like I'm halfway to the mirror finish. There's still alot of imperfections in the metal. I'm wonder if that's because of a lack of sanding before hand, or improper use of polishing.

Image

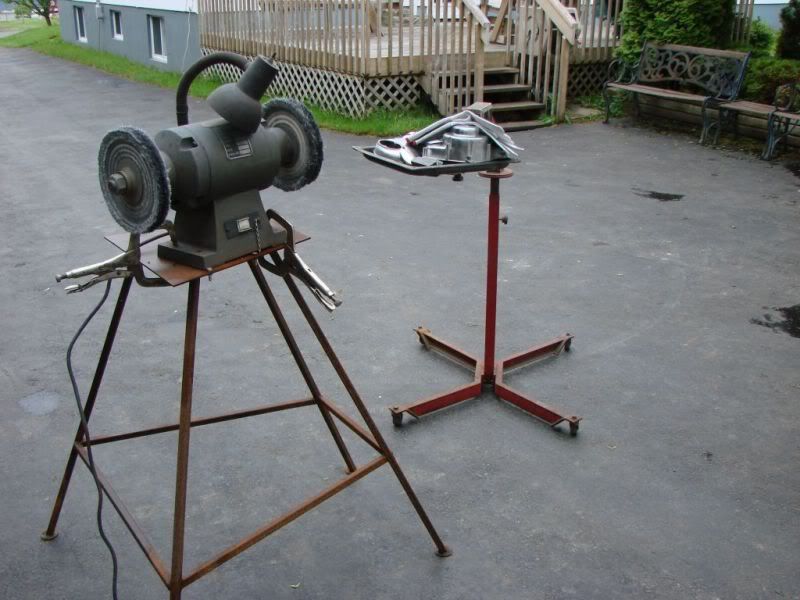
From left to right: Spiral sewn wheel, used with black emery compound. Loose spun cotton wheel, used with white rogue polishing compound. Clean buffing wheel.

Image

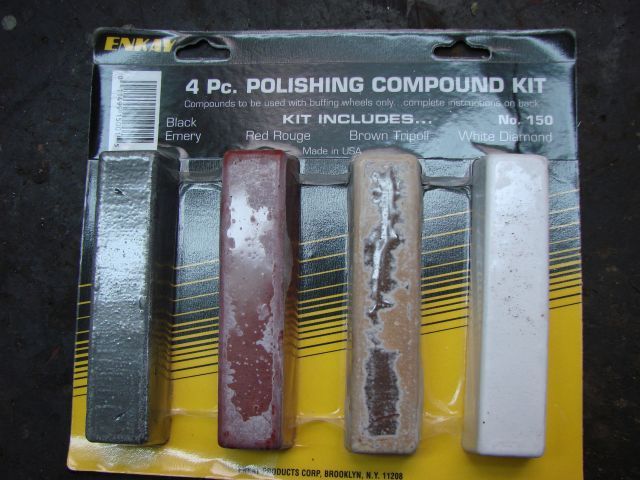
From left to right: Brown "tripoli" bar, white "rogue" bar, and black "emery" bar.

Image

4shorts
honda305.com Member
Posts: 436
Joined: Thu Sep 21, 2006 8:45 pm
Location: Newfoundland, Canada

Post by 4shorts » Sun Mar 22, 2009 8:36 am

Scott. Don't get discouraged because the idea of all of this is to gain experience and to learn. I attached a few photo's. sorry if you've seen them before but if you haven't that's good.

I think you might be using to much buffing compound at one time. It only requires a little dab and then let the buffing wheel do it's job. If you apply to much compound it will smear and look dull.

My advise would be to clean the buffing wheels with a brush and just apply a small bit of compound. When I'm doing my buffing the parts get so hot I have to put welding gloves on and yes it's takes time. One of my side cases took 2.5 hours to do it the way I wanted it. I use only one black for the rough and white for the fine buff. as for the scratches. You can sand them out but that's added time.

If your in a rush this is not meant for you to do. Relax and enjoy what your doing. Good luck, Paul


Image

Image

Image

Image
1964 CT200
1965 C78 305 Dream
1966 C100 Cub
1966 C200 90 Touring
1969 Z50AK1
1972 C70 Cub
1972 CT70 K1
1984 C70 Passport
2003 GL1800 GoldWing

Spargett
honda305.com Member
Posts: 592
Joined: Wed Jun 18, 2008 10:19 pm
Location: Los Angeles, CA

Post by Spargett » Sun Mar 22, 2009 4:35 pm

Thanks Paul, great tips. I have started to feel some of the smaller pieces getting hot, but never that hot. A good sign I'm not going for long enough. I'll give it another run today with more time (and less polish). Thanks again, I'll let you know how my progress is.

bigolsalmon
honda305.com Member
Posts: 3
Joined: Wed Mar 18, 2009 10:06 pm
Location: Denver, Colorado

Repair Manual

Post by bigolsalmon » Tue Mar 24, 2009 4:39 pm

Hi everyone!

Paul I was curious where the diagrams you posted on page 9 came from? Is there a service manual for the C200? I have the owners manual for my C200 but it does not have any of those wonderful diagrams.

Working on cleaning up my tank. Did the Kreem kit on it and it turned into a disaster but will post more on that later. Doing an acetone slosh on the Kreem lining and starting over. I will be able to tell everyone what *not* to do and how to prevent your wife's voice from increasing a few octaves... 8)

Thanks!

- Bill
Denver, CO

4shorts
honda305.com Member
Posts: 436
Joined: Thu Sep 21, 2006 8:45 pm
Location: Newfoundland, Canada

Re: Repair Manual

Post by 4shorts » Sat Mar 28, 2009 3:57 am

bigolsalmon wrote:Hi everyone!

Paul I was curious where the diagrams you posted on page 9 came from? Is there a service manual for the C200? I have the owners manual for my C200 but it does not have any of those wonderful diagrams.

Working on cleaning up my tank. Did the Kreem kit on it and it turned into a disaster but will post more on that later. Doing an acetone slosh on the Kreem lining and starting over. I will be able to tell everyone what *not* to do and how to prevent your wife's voice from increasing a few octaves... 8)

Thanks!

- Bill
Denver, CO
Sorry Bill for taking so long to respond to your questions. I should be checking back more often to check the thread. The printed material you see posted here was taken either from my C200 parts manual or my C200 owners manual. There may be a reference where I'll even use a shop manual from a C100 to explain something.

Sorry to hear about the Kreem problem. One thing I found that worked great for me was to place a small air hose in the tank with about 2 psi pressure on it so that when the coating is added it has a good air flow in there for it to set up. When the first layer set's up I poor in the next layer and place the air hose in again and it sure works well. Hope this helps. Paul
1964 CT200
1965 C78 305 Dream
1966 C100 Cub
1966 C200 90 Touring
1969 Z50AK1
1972 C70 Cub
1972 CT70 K1
1984 C70 Passport
2003 GL1800 GoldWing

Freshapple
honda305.com Member
Posts: 9
Joined: Mon Jun 16, 2008 11:55 pm
Location: Wisconsin

Engine bolts for Crank Case

Post by Freshapple » Wed Jun 24, 2009 10:57 pm

Paul, once again, your expertise and knowledge is inspiring. I love the detail you put into your projects.
I was able to use your posted picture and get things lined up between the cam and cylinder.

Now, the next step involves putting the 2 crank case covers back together. The only problem is that the micro-fiche I have doesn't illustrate the size of bolt I need to put the halves together. I measured the original ones at M6 x 60mm, but there are a few shorter ones. It looks like there is a total of 9 that go around the case. 1 or 2 of them may be shorter than 60mm and I don't remember where I took the original ones out from.
Take a look at my finger pointing to the bolts I am desribing for the crankcase cover.

Does anyone have a reference for the quantity and size of the bolts required to rejoin the crankcase halves? The torque settings would be good too.
Thanks
Attachments
My finger is pointing to one of the bolts I need the sizing for.

4shorts
honda305.com Member
Posts: 436
Joined: Thu Sep 21, 2006 8:45 pm
Location: Newfoundland, Canada

Post by 4shorts » Fri Jul 24, 2009 6:09 pm

I wish I had a service manual to help you but I don't. If I were you I would just measure the depth of each hole and then match the bolts that should go in eash hole. Here in Newfoundland if we don't know the proper torque we just say " put'em in a grunt and a half".
1964 CT200
1965 C78 305 Dream
1966 C100 Cub
1966 C200 90 Touring
1969 Z50AK1
1972 C70 Cub
1972 CT70 K1
1984 C70 Passport
2003 GL1800 GoldWing

Post Reply


CB-77 | CYP-77 | Road Test | Riding Log | Literature | Zen | Marketplace | VJ Survey | Links | Home