G-Man,
Thanks very much for the helpful reply on the correct gear engagement. I think I have enough understanding now to tackle it. I appreciate you taking the time to answer.
My next problem is to get the cranckcases spilt to get into the transmission. I have posted a question to Jensen as I see he has managed to do it without taking off the clutch and crankshaft gear.
Gordon


honda305.com Forum
Vintage Honda Owners, Restorers, Riders and Admirers
1961 CB72 Project
-
mcconnellfrance
- honda305.com Member
- Posts: 115
- Joined: Sat Sep 21, 2013 3:31 pm
- Location: Ayr, Scotland

Gordon
Let us know how you get on. Did you have the usual symptoms of the kickstarter moving. Let me know if you need any rollers. I just bought a large bag of them from a bearing stockist.
G
Let us know how you get on. Did you have the usual symptoms of the kickstarter moving. Let me know if you need any rollers. I just bought a large bag of them from a bearing stockist.
G
'60 C77 '60 C72 '62 C72 Dream '63 CL72
'61 CB72 '64 CB77 '65 CB160
'66 Matchless 350 '67 CL77
'67 S90 '77 CB400F
'61 CB72 '64 CB77 '65 CB160
'66 Matchless 350 '67 CL77
'67 S90 '77 CB400F
I found a few more burrs on the cases which needed attending to.

Those were sorted out with a long flat file. It is possible to 'feel' the burrs and once they are smoothed out the file just slided nicely across the surface.
Then it was on to sealing up the cases. This is the first time I have used Hondabond and on the packet it says that it is a liquid product and can be applied with a brush. The stuff in my tube seemed quite thick and gloopy. I normally use hylomar and apply it with a finger. I can get a thin film that way. Jerry recommended using the brush and just making a thin line of the material, making sure to create a circle around each stud and stud hole. I made a bit of a "pig's ear" of my first go with Hondabond and think I would go back to using my fingers next time.

To compond my bad workmanship, I quickly found a pair of oil separator plates on the bench after the case bolts were torqued up. At least I got to see how the Hondabond had spread out. :-)
I cleaned everything up and used my fingers to spread a much thinner film, just using the brush to go around the studs. A small film of sealant went under each washer also.
Everything went back together nicely and I kept checking the rotation of all shafts as I tightened things up. Seals were placed in the appropriate places as the cases went together, making sure not to damage them on keyways or splines.

It was nice to get this far after all of the cleaning and crank work. The crank felt nice and smooth back in the 54 year old crankcases. I am away for a few days so further assembly will have to wait until next week.

G
Those were sorted out with a long flat file. It is possible to 'feel' the burrs and once they are smoothed out the file just slided nicely across the surface.
Then it was on to sealing up the cases. This is the first time I have used Hondabond and on the packet it says that it is a liquid product and can be applied with a brush. The stuff in my tube seemed quite thick and gloopy. I normally use hylomar and apply it with a finger. I can get a thin film that way. Jerry recommended using the brush and just making a thin line of the material, making sure to create a circle around each stud and stud hole. I made a bit of a "pig's ear" of my first go with Hondabond and think I would go back to using my fingers next time.
To compond my bad workmanship, I quickly found a pair of oil separator plates on the bench after the case bolts were torqued up. At least I got to see how the Hondabond had spread out. :-)
I cleaned everything up and used my fingers to spread a much thinner film, just using the brush to go around the studs. A small film of sealant went under each washer also.
Everything went back together nicely and I kept checking the rotation of all shafts as I tightened things up. Seals were placed in the appropriate places as the cases went together, making sure not to damage them on keyways or splines.
It was nice to get this far after all of the cleaning and crank work. The crank felt nice and smooth back in the 54 year old crankcases. I am away for a few days so further assembly will have to wait until next week.
G
Last edited by G-Man on Tue Apr 21, 2015 12:20 am, edited 1 time in total.
'60 C77 '60 C72 '62 C72 Dream '63 CL72
'61 CB72 '64 CB77 '65 CB160
'66 Matchless 350 '67 CL77
'67 S90 '77 CB400F
'61 CB72 '64 CB77 '65 CB160
'66 Matchless 350 '67 CL77
'67 S90 '77 CB400F
Should get a bit more time in the workshop tomorrow before I have to dash off again.
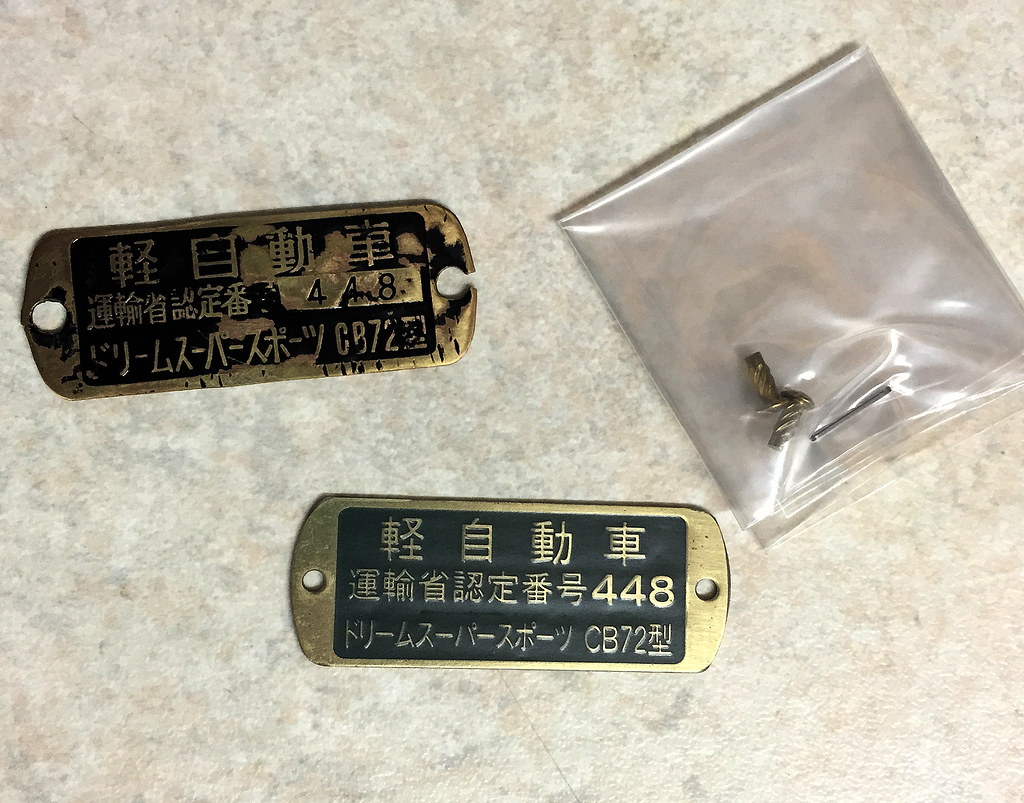
While I was away this beautiful model plate arrived from Japan. The original on my bike was damaged from rust bubbling away underneath and I was contemplating having a new one etched from brass. Luckily this one turned up....
G
While I was away this beautiful model plate arrived from Japan. The original on my bike was damaged from rust bubbling away underneath and I was contemplating having a new one etched from brass. Luckily this one turned up....
G
'60 C77 '60 C72 '62 C72 Dream '63 CL72
'61 CB72 '64 CB77 '65 CB160
'66 Matchless 350 '67 CL77
'67 S90 '77 CB400F
'61 CB72 '64 CB77 '65 CB160
'66 Matchless 350 '67 CL77
'67 S90 '77 CB400F
I've managed a little bit of bike 'fettling' mixed in with gardening duty and getting things ready for my trip to Russia. It's only just warming up here so a trip to a colder climate isn't an inviting prospect.
I got Alan's speedometer back together after one or two 'complications'. The first was when I put a dent in my 'best' chrome bezel and had to resort to a slightly less than perfect one. Then the revcounter needle came off almost as i had completed putting the finishing touches to the bezel.
I did managed to test both speedo and revcounter with my battery drill. Both parts compared well with a NOS unit I picked up a year or two ago.
The day didn't start well but I promised Alan his speedo for next week's Stafford Classic Show. I think I may have to come up with some tooling for pressing the dings out of these bezels as I now have a collection of sub-standard ones.


I bought some low temperature "press alloy" a while back and need to try it out. Essentially it melts at low temperature and you can used it to take an impression of a perfect part of the speedo ring. By making male and female "tools" from a good part of a speedo ring they can then be used to press damaged parts back in to shape. I'll report back with the results when I get set up to try it out.
G
I got Alan's speedometer back together after one or two 'complications'. The first was when I put a dent in my 'best' chrome bezel and had to resort to a slightly less than perfect one. Then the revcounter needle came off almost as i had completed putting the finishing touches to the bezel.
I did managed to test both speedo and revcounter with my battery drill. Both parts compared well with a NOS unit I picked up a year or two ago.
The day didn't start well but I promised Alan his speedo for next week's Stafford Classic Show. I think I may have to come up with some tooling for pressing the dings out of these bezels as I now have a collection of sub-standard ones.
I bought some low temperature "press alloy" a while back and need to try it out. Essentially it melts at low temperature and you can used it to take an impression of a perfect part of the speedo ring. By making male and female "tools" from a good part of a speedo ring they can then be used to press damaged parts back in to shape. I'll report back with the results when I get set up to try it out.
G
'60 C77 '60 C72 '62 C72 Dream '63 CL72
'61 CB72 '64 CB77 '65 CB160
'66 Matchless 350 '67 CL77
'67 S90 '77 CB400F
'61 CB72 '64 CB77 '65 CB160
'66 Matchless 350 '67 CL77
'67 S90 '77 CB400F
After my clumsy attempts to finish the speedo I was a little bit reluctant to get started putting the pistons and barrels on the '61 CB72 engine. I have days like this where I spill the sugar in the kitchen when reaching for something or drop things that I thought I had a firm hold on.
I decided to make a start and see how it went. I was anticipating dropping all sorts of bits inside my newly-assembled crankcases so I went slowly and took plenty of precautions.
These early engines have a different arrangement for oilways between barrel and crankcases so I made sure I had the correct gasket. This was given a light coating of silicone grease to ease its bedding in to the joint faces.

Then I carefully threaded over the barrel studs making sure I didn't tear it.

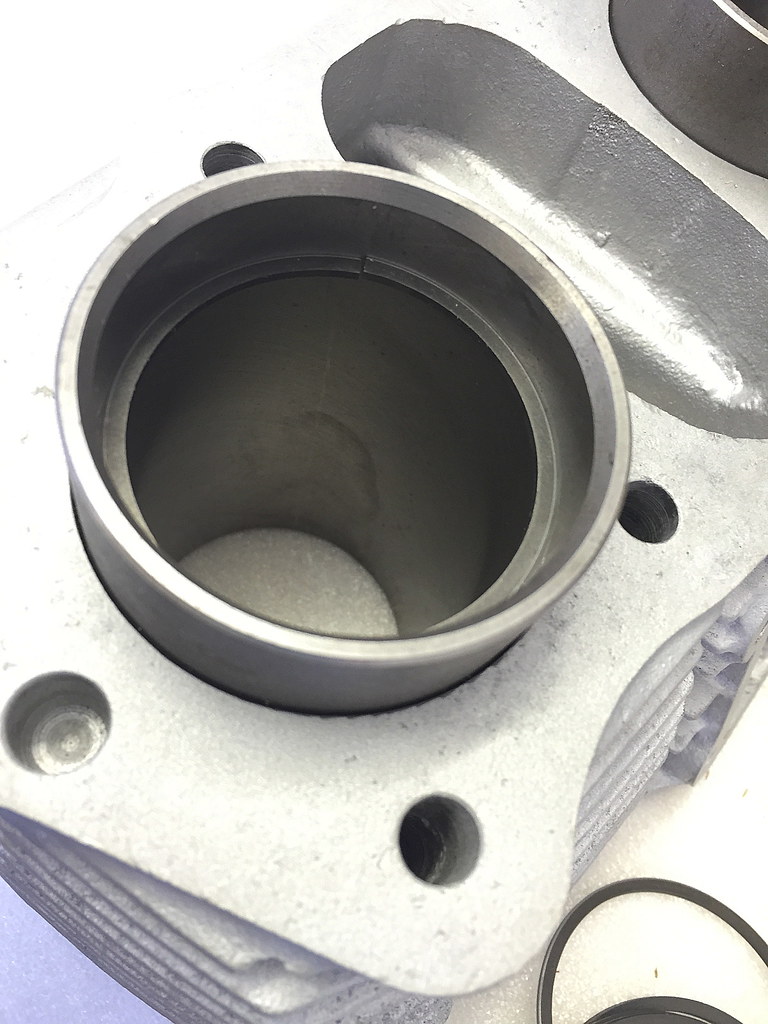
This is the different oil feed, where oil gets to the barrel and head via this feed next to the left front stud. Later models have an extra hole to do this job.

This engine is going together with the early 010 pistons which have a 9.5:1 compression ratio provided by a higher dome. I've never seen 000 pistons but wonder if those were 4-ring types like the early Dreams?

The ring gaps were checked by putting them in the sleeve and pushing them down square with the piston skirt.

For putting the piston rings on I just use my thumbnails and carefully ease them over the piston starting with the oil scraper first. Next the inner circlips go in so that only the outer, more accessible ones need fitting with the pistons in place.
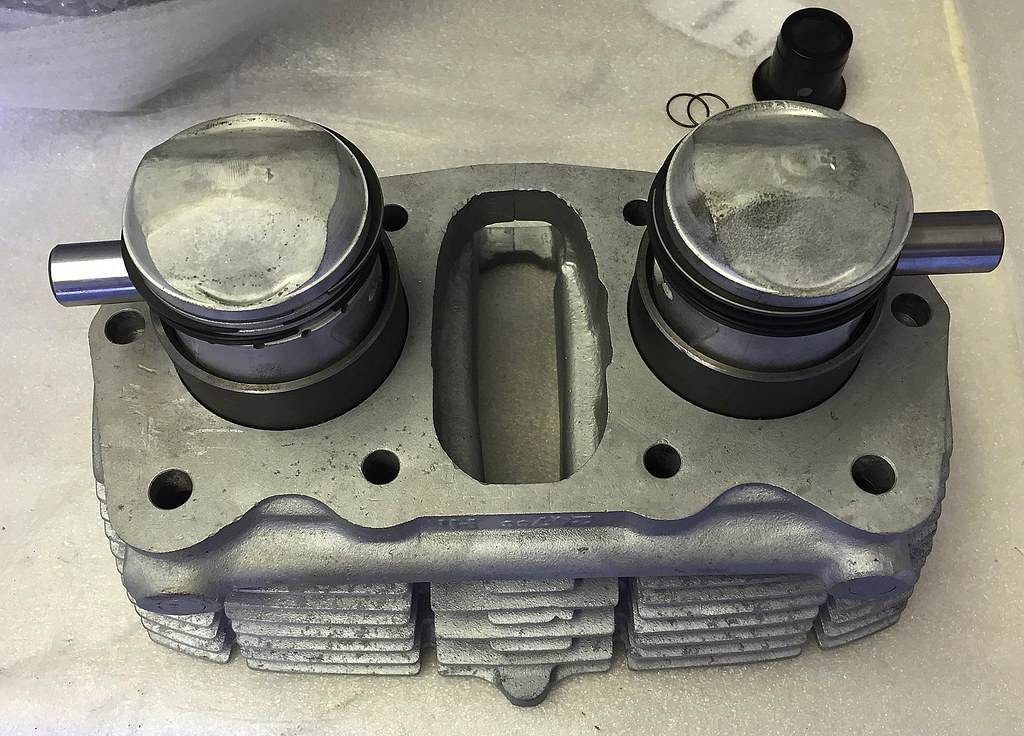
It was really nice to just slide those wrist pins into place in my freshly bushed small ends. The pins pushed in with finger pressure and I blocked up the crankacse mouths before putting in the circlips.

I find the job of getting the rings into the bores pretty straightforward using just thumbnails and a small flat screwdriver. I oil the pistons and bores first, align the piston ring gaps at 120 degrees, set one piston at TDC and place a small pair of rubber handled pliers underneath to support it. The pressure of the studs in the barrel is enough to hold the barrel and stop it falling.

With that done I remove the pliers and let the first piston down with the barrel until I can engage the second piston and rings. A lot of people like to have a friend on hand to help with this process but I prefer to work alone, controlling the pace myself.
It was possible to rotate the crank with my hand and listen to the lovely 'swishing' sound of the rings working on those NOS Honda liners. A 54 year old bike on STD bore - that's a nice feeling.

G
I decided to make a start and see how it went. I was anticipating dropping all sorts of bits inside my newly-assembled crankcases so I went slowly and took plenty of precautions.
These early engines have a different arrangement for oilways between barrel and crankcases so I made sure I had the correct gasket. This was given a light coating of silicone grease to ease its bedding in to the joint faces.
Then I carefully threaded over the barrel studs making sure I didn't tear it.
This is the different oil feed, where oil gets to the barrel and head via this feed next to the left front stud. Later models have an extra hole to do this job.
This engine is going together with the early 010 pistons which have a 9.5:1 compression ratio provided by a higher dome. I've never seen 000 pistons but wonder if those were 4-ring types like the early Dreams?
The ring gaps were checked by putting them in the sleeve and pushing them down square with the piston skirt.
For putting the piston rings on I just use my thumbnails and carefully ease them over the piston starting with the oil scraper first. Next the inner circlips go in so that only the outer, more accessible ones need fitting with the pistons in place.
It was really nice to just slide those wrist pins into place in my freshly bushed small ends. The pins pushed in with finger pressure and I blocked up the crankacse mouths before putting in the circlips.
I find the job of getting the rings into the bores pretty straightforward using just thumbnails and a small flat screwdriver. I oil the pistons and bores first, align the piston ring gaps at 120 degrees, set one piston at TDC and place a small pair of rubber handled pliers underneath to support it. The pressure of the studs in the barrel is enough to hold the barrel and stop it falling.
With that done I remove the pliers and let the first piston down with the barrel until I can engage the second piston and rings. A lot of people like to have a friend on hand to help with this process but I prefer to work alone, controlling the pace myself.
It was possible to rotate the crank with my hand and listen to the lovely 'swishing' sound of the rings working on those NOS Honda liners. A 54 year old bike on STD bore - that's a nice feeling.
G
Last edited by G-Man on Tue Apr 21, 2015 12:21 am, edited 1 time in total.
'60 C77 '60 C72 '62 C72 Dream '63 CL72
'61 CB72 '64 CB77 '65 CB160
'66 Matchless 350 '67 CL77
'67 S90 '77 CB400F
'61 CB72 '64 CB77 '65 CB160
'66 Matchless 350 '67 CL77
'67 S90 '77 CB400F